If you updated your Meizu system device and Google Play App Store is gone, disappeared, and now you can’t download apps from the play store or use Google services such as Gmail or you see only the Meizu account, you need to reinstall Google services.
Restore Google App Store in Meizu Device
It is known problem which appears after an upgrade to new version or while you restored your system device to the basic manufacturer settings.
Our solution is simple. In order to fix it, you need to install a special APK which will reboot the service and will allow you to install all needed Google services.
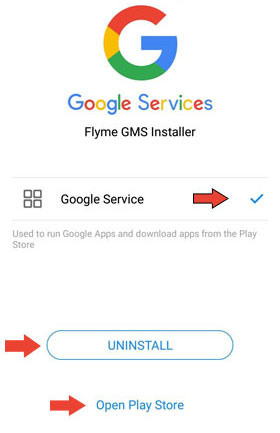
Go to the basic App Store of Meizu. If you need to sign up or sign in, please do so.
In the search field at the top of the screen type: gms and click search.
In the list of results you will see Google Apps Installer – install it and wait until it’s done.
After the installation of this app, open it and click on the Install botton. This botton will install Google services in your device.
When this installation will end, get in this app again and click on ‘Install Play Store’ option.
Now you can go to the main screen of your device and see the icon of Google Play. Open it, sign in with your Google account username and password and doanload all Google apps and services you need such as Gmail and other.
In the old versions of Windows operating system we had a different connection icon in the task bar. In the new version of Windows 10, the old icons where replaced by static icons – a simple icon of computer for line wired connection and a dot with curved lines for wireless Wi-Fi connection.
Old Windows Versions Connection Icons In The Task Bar
Some of out readers asked us if they can restore the old versions icon which were two computers blinking or the two arrows – red and green – which showed and indicated the outgoing and ingoing data to and from the computer.
Well, the short answer is no. You can’t change the connection icons for Windows 10 to the old versions icons.
But, there are other solutions you can use to solve this problem or need. If you like, you can download and install external softwares and Apps for Windows 10 which allow you to see the old version icons such as NetTraffic or Network Activity Indicator and other.
At this point we will add a personal notification: We don’t like any apps and software we don’t know or count on . It can be dangerous to use software you don’t know or you not sure about it, specially, software and apps dealing with transferring data. It might be not safe for your computer and your data. So, think twice before using unknown software made by unknown creators.
If you decided to use Mozilla Thunderbird software as your email manager program you can benefit a lot from it. Mozilla Thunderbird is a great solution for those who want to use a local computer software with all the features it is offering such as Email accounts separate folders, contacts cards and details, calendar and an easy task list managers.
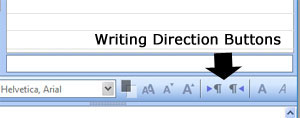
Right-To-Left Writing Direction Buttons
Mozilla Thunderbird has many other open source features you can add as Add-Ons. A lot of Add-Ons which you can pick and install easily to benefit more from this software. Some of the software’s add-ons will be a great solution for features you won’t find in the basic installation of the software.
Writing From Right To Left (RTL) Add-On
One of the problems users who installed the English version encounter is the writing direction buttons that do not appear in the basic installation of Mozilla Thunderbird English version. If you want to use the English UI (user interface) of the software but still be able to write part or all your email massage in right to left languages, you can’t do it because there are no writing direction buttons which allow you to change the writing direction from left-to-right to right-to-left.
As we hope Mozilla Thunderbird will fix it someday and add this feature to the basic English version, there are two solutions you can use to solve this problem:
The first solution is to uninstall Mozilla Thunderbird software English version and reinstall it in your language interface. If you a Hebrew or Arabic or other right-to-left languages users, you can find different language version for the software and install it.
The second solution is a great Add-On you can install and use in Mozilla Thunderbird fast and easy – BiDi Mail UI Add-on. BiDi Mail UI will add to your buttons options two writing directions buttons which allow you to switch between the writing directions easily and fast.
You can find BiDi Mail UI add-on inside the Add-Ons section of Mozilla Thunderbird. Just install it and start using it (you might need to close and re-open Mozilla Thunderbird). simple as that.
Now, every time you will open new massage, you’ll be able to click the direction button and write in the direction you need.
Note: If you updated or upgraded Mozilla Thunderbird to its latest version, you might see that the writing direction buttons of BiDi Mail UI add-on are gone.
To get these buttons back, all you need is to go to the Add-Ons window inside Thunderbird and update the BiDi Mail UI add-on by clicking the button in its row. After updating the add-on, close Mozilla Thunderbird software and re-open it. From now on you will see the writing direction buttons on the buttons bar in every massage.
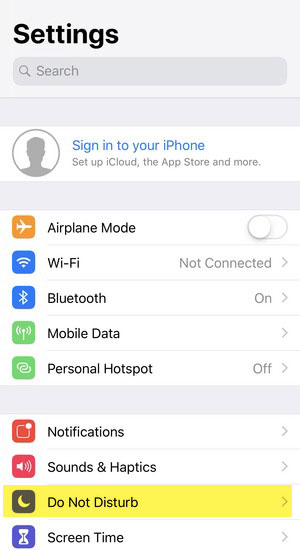
If you don’t receive any calls and people who trying to call you say that they are transferred directly to your voice mail, it might happen because you are on Do Not Disturb mode on your iPhone.
To activate or deactivate Do Not Disturb mode:
Do Not Disturb Option in The Settings Window
Open Settings on the main screen of your phone.
Scroll down and look for Do Not Disturb option and click it.
In the Do Not Disturb window, deactivate and turn off this option by clicking it (Green or blue – Activated state, Gray – Deactivated and turned off).
That’s it. Ask a friend to give you a call and check if all fixed for you. If the problem consists, try to contact your cellphone provider to get help, it might be a problem with your cellphone line and other technical problem.
If you’re watching Netflix content but you can’t see any subtitles for your movie or series, you can fix it easily on the subtitle preferences in your account.
The problem is that there are active subtitles on the screen as you can see subtitles when it appears at the top of the screen but not at the bottom of the screen. It seems like a layer covers the subtitles and avoid us to see it.
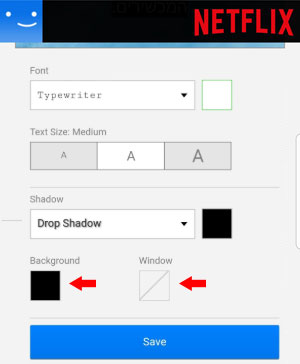
Netflix Subtitle Preferences Window
Show Hidden Subtitles on Netflix
Use your browser to get into your Netflix account Subtitle Preferences by clicking here. Log in to your account if needed.
On this link you’ll find all Subtitle Preferences for netflix content.
At the bottom of this window you will find the colors preferences for Window and Background.
Click on the squares and select the black color for each of the above option.
Click the Save button and close the window.
Open Netflix again and select one of the movies or series epizodes and check if it solved.
The problem should be solved and should not repeat itself.
In the previous version of windows we were used to enjoy an easy to use, comfortable, fast free and dedicated video editor, but it’s seems that in the last version of Windows which is Windows 10, Windows Movie Maker disappeared. Well, after checking this issue we discovered that Windows Movie Maker didn’t disappeared but only got hidden.
Editing Videos in Windows 10 Free Editor
Windows Movie Maker – Where Did You Go?
As said, Windows Movie Maker didn’t been removed from the Windows operating system (and thank god for that), but only been hidden for some reason in it. There is no direct button to the editor from the task bar or windows main menu – but it still exists in the Photos Editor as an video editing option.
If you open a photo or a video file in Windows Photos and right-click on it with your mouse, you will get the option to edit videos with most of the options which were in Windows Movie Maker.
How To Get To Windows Free Videos Editor
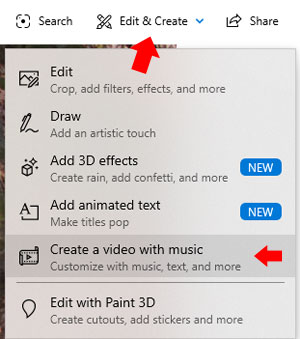
Right click with your mouse on a photo or video file opens a menu.
Select the Open With.. option and select Photos.
In the new window, select Edit and Create from the menu at the top.
In the new menu, select the Create a video with music option.
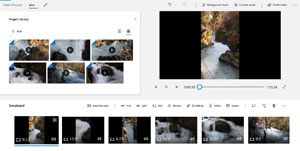
There you’ll see the Windows video editor with the most of the editing options you could find in Windows Movie Maker.
Windows 10 Free Video Editor
Now you can add videos, combine, cut, add effects and filters to your movie, even add 3D cool filters, save it and extract it. Still, we couldn’t find the Transitions animations which we could add between parts in the video as before, but we can manage without it.
WhatsApp is one of the hottest apps in the field of text messaging and video calls. This app is compatible with Android and iPhone operating systems and allow everyone to use it for free to connect with family and friends.
WhatsApp Web QR Code
WhatsApp Allows you to chat with others using your mobile phone, but also you can use it on your computer and laptop for messaging your friend from your own account with its web version using browsers such as Chrome, Firefox and others or by installing and using dedicated app for computers operating systems.
While using the app on your computer or laptop, all its content will sync and will show also on your smartphone version app.
WhatsApp Web Version Using Browsers
Open your browser (Chrome, Edge, Firefox etc.)
Go to https://web.whatsapp.com and there you’ll see a QR code which we’ll use on the next steps.
Open WhatsApp app on your smartphone and go to the 3-points menu at the top of the screen.
Select WhatsApp Web option.
Scan the QR code on your computer screen with your smartphone. That’s it. You will see WhatsApp on your computer through your browser. Also save its URL address for later on your favorites for easy access.
WhatsApp App For Computers and Laptops
Another option is to use WhatsApp as an installed app on your computer with desktop shortcut as so. Installing WhatsApp as an app on your computer will offer a comfort access to the app. You can download WhatsApp for MacOS 10 or Windows 8 and greater. Just open this URL address https://www.whatsapp.com/download and install the app on your computer. After the first time you open the app, you will need to scan the QR code with your smartphone’s WhatsApp App as instructed on the steps 3 to 5 above.
Video Calls On WhatsApp Computers App
Well, on the first use of the app on your computer, you notices that you can message text and send files, pictures and videos and voice messages, but you can’t make video calls like on the smartphone app.
Unlike the mobile phone app, you can’t make video calls using WhatsApp on your computer. But, we have a solution for you if you don’t want to settle for the text and voice messages.
By installing and using Android Emulator on your computer you can do it. In few words, an Android Emulator is a software which opens a window on your computer and act as Android OS. By installing this emulator, you can do everything you can do on an Android OS such as games for Android and more. So, if you open WhatsApp through an Android Emulator window, you will be able to make video calls too.
Nox Player Android Emulator Screen
You can find many Android Emulators using google search. Try to search for users recommendations first. Some of the recommended Android Emulators you might find are Nox Player, YouWave, BlueStack and more. Please note, that Android emulator require a good technical specifications of your computer, otherwise your computer will be slow, very slow.
If it is too complicated for you, you can use other software for video calls such as Skype, Zoom and others.
If you’re using a regular wired USB printer, you already know how irritating and tiring it is to print some pages on your printer. If your laptop isn’t near the printer, you got to take it, connect the USB cable to it, turn on the printer and send your file to print. All this process might take few precious minutes from our work.
Wireless Printer Server Device
New Wireless Printer
New Wireless Printer can be a great solution for people who want to save time while printing. Wireless printers work washout any wires or cables. After an easy and fast setup, you can start sending files to print from any place at home or office.
Wireless printers are the near future solution for printing, same as the wired mouse almost gone and most of us already use wireless mouse. It’s good to catch up with the technology from time to time.
Moreover, these days the prices of new wireless printers is pretty fair. You can find wireless printers starting from $50 for simple ink wireless printers. So, our first solution for printing fast without getting to your printer is buying a wireless printer.
Wireless Printer Server
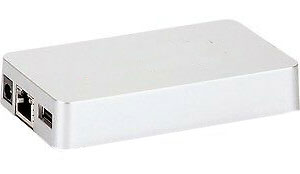
If you can’t afford buying a new wireless printer, you can try this DIY solution using Wireless Printer Server.
The wireless printer server is an external device connected to your printer with standard USB cable. This device allow you to turn your wired USB printer into a wireless printer and send to print files to your regular printer fron anywhere after an east and fast setup.
As for the prices, most of the wireless printer servers are cheaper than a new wireless printer cost. Important note as for wireless printer servers: While searching and buyng it, check if the cables you get with the printer server compatible with your printer. If not, you might need to get a sutible adapter to connect the printer server with your regular printer.
Using Your Router To Turn Your Wired Printer Into Wireless Printer
Our third and last solution is to use your internet ISP router or an old router into wireless printer server device. Of course, in this case, you need some extra technological skills, but you can find great guides on the internet to do it. It’s not complicted as it seems.
This free solution can save you money and make your work easy. But (There’s always be ‘but’) in this case, you need to place your regular printer near your router point, so you’ll be able to connect between the two devices.
Printing in a Digital World
Last thing as for this wireless printers or generally printing – If you don’t have to print – avoid it.
There are many solutions which help you avoiding printing, spending papers, spending Ink and making the world a clean place for our children. Every printed page counts. Try to find other options instead of printing your files if your really don’t have to print it.
For example, if you get a file and you need to sign it or fill it, you can use Adobe Acrobat Reader to edit, fill, sign and send files free without printing it. it’s easy and simple.
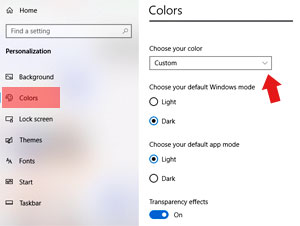
The big latest windows update which accrued lately ended with a color change from black to grey in the bottom bar – the task bar and so the headers of every window or tab.
For those who used to the black task bar from the previous version which make the best contrast to the bottom icons in the task bar – you can change it easily.
How to change the task bar color back into black?
Click on the windows icon on the edge of the task bar.
Select the Personalization option in the new window.
Select Color option on the left menu so you will get the color options on the right of the window.
Click on the first menu (jump select menu) and you will find 3 option: Light, Dark and Custom.
Select the Custom option.
Under this menu you will find more option – Select the Dark option.
On the next option select Light (for the windows headers and tabs color).
Color Options For Task Bar and Window Header or Tabs
That’s it. The task bar and the windows / tabs header will get back to what you have used to in the previous version, before the latest update of windows.